The 'Wow' Starts Now!
I think this ad by Microsoft on the the new Vista is quite inspiring.
Video: Windows Vista "Wow" ad
I think this ad by Microsoft on the the new Vista is quite inspiring.
Video: Windows Vista "Wow" ad
I've been in the midst of trying to upgrade my Project Server 2003 instance to 2007. I encountered an error as below when trying to upgrade WSS2.0 (where all the Project Workspace is kept) to WSS3.0:
Prescan has encountered sites or lists that were not updated because they cannot be accessed using the SharePoint Products and Technologies object model. The most likely reasons for Prescan to skip a list are covered in the Knowledge Base article at: http://go.microsoft.com/fwlink/?linkid=69958&clcid=0x409.
I searched high and low, tried everything as suggested in the Knowledge Base article above. Which I then referred to another Knowledge Base article 923904. I did method 1, it returned no orphaned items and I made sure that root has explicit inclusion on the WSS 2.0 site.
So what do you need to do to get prescan.exe to finish SUCCESSFULLY?
The reason for all this as explained to me by Ada Pan (Microsoft Online Partner Support) that this problem also may be caused by inconsistence of SharePoint databases (Config- and Content-Database). Prescan is checking Sites, which are listed in the config database This process runs without issues. Later Prescan checks the sites which are defined in the content database(s). Prescan is trying to access these sites via SharePoint Object Model. This step fails, because the site is not in the config database.
I've seen this post going around on some blogs. I never imagined it would reach me. Thanks to Eddie, I now have to tell you five things you never knew about me. Here it goes -
I think I've completed my duties in contributing to this "blog post phenomenon" that is taking the blogging world by storm! I wonder what's next?
The fun part is, tagging 5 other people.
This is also officially my first blog for the year!
The company I used to work for which is Fuji Xerox will be collaborating with Microsoft in the Document Management Solutions Field. All these are happening in Japan. We're looking at possible end to end solutions that include input and output!
Read more about it here!
Sometimes document metadata exists inside the document. So how can we update the Document Information Panel and also at the same time update certain fields within the document? By using a combination of content types, the document information panel and quick parts!
You'd probably want to create some Site Columns. Then create a Site Content Type where the Parent Content Type comes from: Document Content Types and Parent Content Type: Document.

Next, add the created Site Columns to the Site Content Type. Then select Document Information Panel settings. Click on Create a new custom template. When the prompt comes up, click Finish. Save the InfoPath 2007 Form Template. Then go back and upload the saved template.
 Then click on Advance Settings. Upload a new document template for the document content type. Be sure to upload a .docx. You can just upload a blank document at this point. Then go to a site and create document library. As soon as you've created the document library, enable management of content types in the Advance Settings for the document library.
Then add the newly created content type to the document library. Once that has been added, click on the content type and click on Advanced Settings to edit the document template once again. When editing the document template you will notice the document information panel appear (Be sure to have InfoPath 2007 installed to be able to view the document information panel).
Then in Word 2007, Insert, Quick Parts, Document Property. Select the Property that you created.
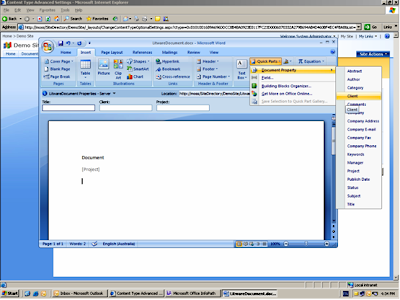
Now when you enter a value for the document metadata in the information panel any reference in the document pointing to it via the Document Property added into the document itself will reflect that!
You can gage the customers readiness in adopting EPM by asking some fundamental questions:
If you had your hopes set on keeping Project Professional 2003 and upgrading to Project Server 2007 that will not be possible.
Project Server 2007 requires Project Professional 2007 as the full-featured desktop client. Project Professional 2003 cannot be used with Project Server 2007 because of the changes in platform architecture.
How do I change the look and feel in PWA? I want to have a corporate feel and change the logo.
You can do that by changing some css files.
Browse to %SystemRoot%\Program Files\Microsoft Office Project Server 2003\IIS Virtual Root\STYLES\1033
Take a look at the PCSTYLES.CSS file.
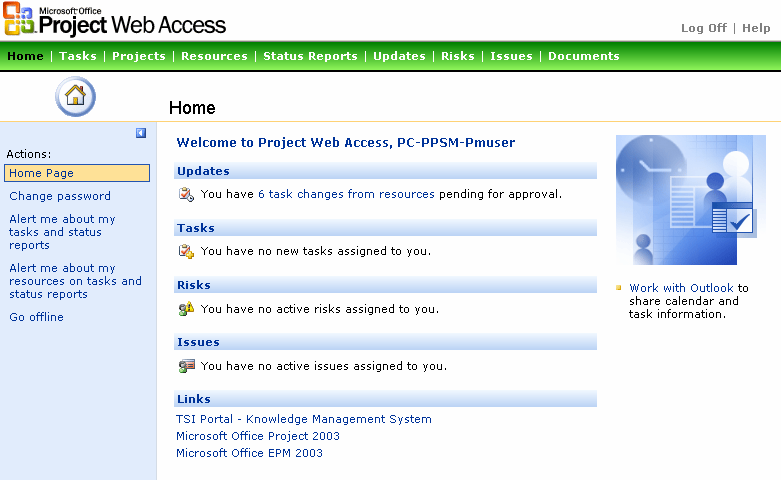
In the image above I've just made some colour changes to the Navigation bar just to show some of the things you can do with the CSS file.
As you should know by now, the EPM solution stack includes ProjectServer 2003, Project Professional 2003, SQL Server 2000 and WSS v2.0. To determine the Service Pack applied to each of them:
Project Server 2003
Check the version of the pds.dll
11.2003.0816 (No Service Pack)
11.2004.0.1707 (Service Pack 1)
11.2005.0.3801 (Service Pack 2)
11.2005.0.4110 (Service Pack 2a)
WSS V2.0 Project Template
There has been no changes since Service Pack 1. The latest service pack just reapplied what was fixed in SP1. To determine SP1 browse to \Common Files\Microsoft Shared\web server extensions\60\TEMPLATE\LAYOUTS\1033\PWAINC.
The date modified of the PWAISSUE.JS should be March 25, 2004.
Project Server 2003 Database
MSP_WEB_ADMIN table and check the values of WADMIN_VERSION_MAJOR and WADMIN_VERSION_MINOR fields.
11,0 (No Service Pack)
11,1 (Service Pack 1)
11,2 (Service Pack 2)
11,2 (Service Pack 2a)
Unable to determine between SP2 and SP2a. If you're really not sure, reapply the SP2a for the database.
Project Professional 2003
Check the version properties of the WINPROJ.exe
11.0.2003.816 (No Service Pack)
11.1.2004.1707 (Service Pack 1)
11.2.2005.1801 (Service Pack 2)
Make sure both Project Server 2003 and Project Professional 2003 are on the latest and same service pack level.
Thanks to Gord Schmidt's post on Service Packs!
The new Microsoft Office Project 2007 user certification program announced at the PMI Congress show will make it easier for organizations to identify skilled project managers.
Click here to read more about it.
We at Unique World have recently finished a successful Microsoft Office Sharepoint Server 2007 implementation at Melbourne Airport!
Read about it here.
In Project Server 2003:
What you'll have to do is, before you publish your project to the server:
Now the Project Manager can add the selected field he wish to make available in the timesheet.
No so long ago, I posted something about Getting Mobile in Microsoft Office SharePoint Server 2007. This configuration works fine if you're trying to set it up on a physical box. What I've come to realize is the steps do not work if you're trying to set it up in a VPC Image that has MOSS 2007 in it.
The installation steps are the same. Make sure you have the 3 setup files which are (you can install them in the order shown below):
1. Microsoft Device Emulator Version 1.0
2. Virtual Machine Network Services Driver
3. Emulator Images for Windows Mobile 5.0 with Messaging and Security Feature Pack
Next, install Microsoft ActiveSync 4.2
Launch the Pocket PC - Coldboot image by going to Start - All Programs - Microsoft Windows Mobile 5.0 MSFP Emulator Images - PocketPC Coldboot.
Next Cradle the image, by using the Device Emulator Manager. Start - All Programs - Microsoft Windows Mobile 5.0 MSFP Emulator Images - Device Emulator Manager.
You should be able to see the instance of the PocketPC listed. Right click on the instance and select Cradle.
ActiveSync will then come to live. It will prompt you to setup an ActiveSync partnership. You can click Cancel or just set it up if you wish to.
You're then ready to hit the SharePoint 2007 via the mobile device. Within the mobile device, Start - Internet Explorer. Type http://hostname/m. It will prompt you for credentials. Key in the username, password and domain.
You should then see...

The default installation of the MOSS 2007 does not allow a user to associate a workflow with a form content type in a form library.
If you notice when you add a form to a form library and click on the drop down, the workflows option will not be available. If you add a document to a document library, the workflows option is available.
How can we then associate an individual workflow to a content type accross the site. Below are the steps:
The benefits of this is if you have a single content type that you want to have a workflow associated with it or an option of associating a workflow with it, this should be the ideal way to do it.
If not you can Go to an individual Form Library and click on Settings - Form Library Settings. Then follow steps 4-9. With this the workflow is only associated to that individual library.
1. Go to Control Panel - Add and Remove Programs.
2. Select Microsoft Office Mondo 2007 (Beta), click Remove.
3. Click Yes when the dialog box pops up to remove Microsoft Mondo 2007.
Note: If you’re prompted to restart. Restart.
1. Run the Microsoft Office product DVD
2. Select Microsoft Office Professional Plus 2007 (Beta)
3. Enter the VL Product Key when prompted.
4. Accept the License Agreement.
Note: Steps 5a and 6a optional if you’re after .NET Programmability Support for InfoPath.
5a. Click on Customize.
6a. Select “Run from Computer” for Visual Studio Tools for Applications.
7. Click on Install Now.
1. Run the Microsoft Office product DVD
2. Select Microsoft Office SharePoint Designer 2007 (Beta)
3. Enter the VL Product Key when prompted.
4. Accept the License Agreement.
5. Click on Install Now.
Note: Install all other Microsoft Office 2007 Beta Products before performing the upgrade. E.g. Microsoft Office Groove 2007, Microsoft Office Visio Professional 2007, etc.
1. Go to SharePoint Central Administration
2. Click on Site Actions, select Site Settings.
3. Ensure the Version is 12.0.0.4017
Note: This can be checked under the Site Settings of any site.
1. Go to Control Panel – Add and Remove Programs.
2. Select Windows Workflow Foundation, click Remove.
3. Click Yes when the dialog box pops up.
Note: This installs Windows Workflow Foundation version 4203.2.
1. Accept the terms, click on Install.
2. Click Exit to finish installation.
1. Go to Start - Programs - Administrator Tools - Services. / Control Panel – Services.
2. Select Office SharePoint Server Search and click on Stop.
1. Go to SharePoint Central Administration.
2. Click Operations, and then select Services on Server from the Topology and Services section.
3. Find Windows SharePoint Services Search, and click Stop.
4. Click OK when the dialog box pops up.
1. Start the update installation by double-clicking the update file.
2. Accept the End User License Agreement (EULA), and then click Continue.
3. After you accept the EULA, a confirmation dialog box is displayed. Click Yes.
4. Clicking Yes will start installation, beginning with the extraction of the update files.
5. After the update installation has finished, a dialog box will be displayed advising that additional components will require updating.
6. Click OK.
7. Another dialog box will pop up informing that the installation of the Beta 2 Technical Refresh for Windows SharePoint Services is complete.
8. Click OK.
1. Start the update installation by double-clicking the update file.
2. Accept the End User License Agreement (EULA), and then click Continue.
3. After you accept the EULA, a confirmation dialog box is displayed. Click Yes.
4. Clicking Yes will start installation, beginning with the extraction of the update files.
5. After the update installation has finished, a dialog box will be displayed advising that additional components will require updating.
6. Click OK.
7. Another dialog box will pop up informing that the installation of the Beta 2 Technical Refresh for Windows SharePoint Services is complete.
8. Click OK.
1. Go to All Programs on the Start menu, click Microsoft Office Server, and then click SharePoint Products and Technologies Configuration Wizard.
2. A dialog box will pop up, click Yes.
3. Click Next to continue.
4. A dialog box will pop up informing that the following services will be reset during the configuration. Click Yes.
5. Click Next to continue.
6. A message is displayed asking you to run Setup on the remaining servers in the farm. Ignore this; click OK to continue.
7. The process will upgrade and update all the sites to Beta 2 Technical Refresh. Upon completion of the process, there will be a confirmation.
8. Click on Finish.
Verify that upgrade is completed by reviewing the upgrade log.
The upgrade.log file, located at %windir%\Program Files\Common Files\Microsoft Shared\web server extensions\12\LOGS, contains information about your update.
When the update is complete, the log file will finish with the string "upgrade session has finished". The log will also report if there are any errors or warnings. If errors or warnings have occurred, determine your next action based on information in the log file.
1. Run the following from the command line
%windir%\Program Files\Common Files\Microsoft Shared\web server extensions\12\Bin\stsadm.exe –o reconvertallformtemplates
1. Go to SharePoint Central Administration.
2. Click Operations, and select Services on Server from the Topology and Services section.
3. Find Windows SharePoint Services Search, and then click Start.
4. Fill in the required fields, and click Start. You should choose a different default search database name to start this service.
5. Click Start.
1. Start the update installation by double-clicking the update file.
2. Accept the End User License Agreement (EULA), and then click Continue.
3. After you accept the EULA, a confirmation dialog box is displayed. Click Yes.
4. Clicking Yes will start installation, beginning with the extraction of the update files.
5. After the update installation has finished, a dialog box will be displayed advising that additional components will require updating.
6. Click OK.
7. Another dialog box will pop up informing that a reboot needs to be done to complete the installation of the Beta 2 Technical Refresh for Microsoft Office 2007.
8. Click Yes.
1. Start the update installation by double-clicking the update file.
2. Accept the End User License Agreement (EULA), and then click Continue.
3. After you accept the EULA, a confirmation dialog box is displayed. Click Yes.
4. Clicking Yes will start installation, beginning with the extraction of the update files.
5. After the update installation has finished, dialog box will pop up informing that a reboot needs to be done to complete the installation of the Beta 2 Technical Refresh for Microsoft Office SharePoint Designer 2007.
6. Click OK.
To download the steps above accompanied with screenshots, click here.
Some of the experiences I've had with building a workflow in SharePoint Designer 2007. If you're working with the "Wait for value to equal value" action and then "Send an email" action, take note of these:
To get working on the mobile part of MOSS, what you'll need to do is download the Microsoft Windows Mobile Emulator. Follow steps for downloading the emulator, there are three download files. It's best that you install the emulator on the server hosting MOSS. Don't have to worry too much about the networking.
The emulator will allow you to emulate a PDA or Smartphone. I'm more interested in the PDA for now. So below are the steps to get the emulator working and having your first peek at MOSS on a mobile device.


